Saturday, May 19, 2012

Tile Manicure


I like this! A lot! I accidentally smudged it after I was done because I had to save Cash from drinking acetone. Really smart pup I have on my hands. Anyways, here's how (I will be doing a picture how to soon!):

1. Paint your nails with a base color. Preferably one that is lighter than the colors you will be using on top. Except if you use opaque shades, then you should be made in the shade.
2. Let dry completely! This is vital to this manicure. Seriously, let it dry for a good while or else you will pull the base color up and it'll be a disaster.
3. Using thin pieces of tape you cut, place on your nails in a pattern like so. To get thin tape strips, I used an exacting knife and a ruler for a strait edge.
4. Paint around them in the colors uou chose for your shapes, carefully!
5. Put tape up ASAP.
6. Allow 5 minutes or so to dry enough. Put a top coat on and there you go!

Monday, May 14, 2012

Feather Manicure


I love this manicure. Really easy and lasts for a lot longer than expected. Here's how- 

Saturday, May 12, 2012

Extra Fine Glitter Manicure

So when I am at Michael's Craft Store, I am constantly keeping my eyes open for cool manicure ideas. Especially in the sales bins! I found this extra fine glitter on sale for something like, $1.79 so I figured I would give it a try. I am not sure how I feel about this one but I think it could grow on me, with a little tweaking and technique work, of course!

The application process is the exact same as the DIY Tinsel Manicure Tutorial that I posted earlier. But I still put some simple directions on the photos for reference!
Enjoy:)


DIY Tinsel Glitter

So this one was.... interesting. Can't guarantee how much I will wear it but it is definitely fun! And EASY!


1. So you will need, tinsel glitter!
2. Here is my swatch, spoon, polish, and glitter. The spoon is to put the glitter on the end and then sprinkle without making a HUGE mess.


3. Load the end of the spoon up with the glitter. 
4 & 5. After putting the final color coat on or, I think this idea is better, a cheaper top coat sprinkle the glitter on the nail as desired. 


You will be lift with this nail that looks hairy almost! Just put a top coat on, preferably a thick one such as Seche Vite, and you're made in the shade. Might require two coats of top coats. 


Enjoy!

Corner Glitter Gradient

Love this idea of stacking glitter polish WHILE doing a gradient technique from the corner. Super simple!


Eyeshadow Manicure


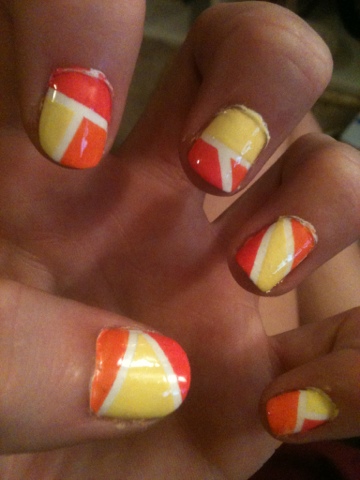
So, I saw a manicure idea on Make Up Savvy's Blog and wanted to try it out! Me being the "frugal" person I am, I didn't want to go out and spend the money on pigment. Which if you look at my pigment manicure tutorial, you will see that I finally bucked up and realized that it was worth it. I found that using mineral eyeshadow worked really well versus compact that I physically made. Hopefully you guys have more luck with that one. However, this will work instead of pigment for the time being! Just not as rich of colors but still noticeable depending on the base color. Pretty easy if I do say so myself, but EXTREMELY messy. Just expect shimmer in the air and on everything, but still very worth it!

It is pretty easy, I didn't take pictures of a how to but you can see one that is virtually the same on my pigment manicure tutorial post.

Basically in the link above, she says to blow the eyeshadow/pigment on at the same time as your last coat of color but I found that that makes grooves from blowing it.. so I would put a cheaper top coat on and then blow the pigment on my nail with a cut up piece of straw. I cut up the straw so that it was easier to control. Also, when I did this on my fingers, which I didn't get a good picture of, I put the powder on the base of my nails right below my cuticles and then applied a clear and cheaper top coat and then blew. This one takes a lot of experimenting, which you can do on a piece of paper, to get your ideal "blowing speed". As dirty as that sounds, it is a serious and crucial thing in regards to this manicure. The Make Up Savvy says that she used the end of a spoon to scoop the color onto the finger which worked incredible well for me. Don't worry if you end up dropping some on your nail, it should be fine. It will just go with the top coat so afterwards be sure to swirl your brush around in the top coat lacquer by literally just spinning the lid in between your layers a few times. Then let sit for a while and then carefully put a top coat on. Also, I did mine one nail at a time and then would let the powder sit while I did the rest of my fingers until I put my top coat on. Then I let my top coat completely dry and then washed my hands and I was good to go! So, hope that helps but be sure to check out my pigment manicure tutorial for more ideas!


Pigment Manicure


So I saw this manicure a while ago on Make Up Savvy's Blog. I
kept meaning to try it out using eyeshadow because I didn't have pigment. But as you can see in my eyeshadow manicure tutorial, the pigment turned out much richer than the eyeshadow. I think they are both fantastic though I will say that. Here is how to:


1. Gather your equipment- I didn't picture the top coat.
2. Load some pigment on the tip of the spoon handle and place on your finger right underneath the cuticle. I am doing it the way I am in the photos because they are on a swatch and not my actual nail. 
3. Blow! Like I said in my eyeshadow manicure tutorial post, you should practice your blowing before you do this!
4. And voila! Done! Wait a little before putting the top coat on, then wash your hands! 

But wait- there's more!

Monday, April 30, 2012

Gradient Tape Manicure


Galaxy Nails!

I posted a picture forever ago that showed my first galaxy nail (below). WITH THE TUTORIAL!


I really loved that one.. but... then I thought I would experiment more with some other colors...


Then I got even CRAZIER and did it with white! Still love this a ton!


But at the end of the day, I just played with new colors... 
And still love this just the same as I always did. This manicure is my guilty pleasure.. 


Corner Striped Manicure

Easy! And classy.


Diamond Nails!

This one is simple and a half! All you do is paint a base coat, then take two pieces of tape, use the corners, and stack like them like pictured and then paint as you please in the opening of the tape.

Tips:
-Wait until your base coat is COMPLETELY dry.. or you will pull off the polish with the tape.
-Stick the tape to your skin and pull off, repeat a few more times. Do this so you remove the 100% stickiness of the tape.
-Be picky about the edge of the tape and make sure there is a good "seal" on it. No air bubbles, lifting, etc.


Then finish with a top coat!


Splatter- With a Twist!

Found this AMAZING way to splatter!!! I've used a straw and a toothbrush before.....

But then I found this tutorial that I love! But there's some things that I want to add in that would make some things clearer. 

First off, use WHATEVER colors you choose. Seriously. 

Second, the paint brush I used was a paint brush that I found at hobby lobby in a bag of random ones all mixed together. So as long as the bristles are soft and decent in length, you will be made in the shade. 

Third- with the acrylic paint to "splatter" on to your nails comes a frustration I encountered. Acrylic paint is too think alone to splatter. I read in a comment that someone said to use nail polish thinner, BAD IDEA. All you need is water mixed with the paint and then you take the brush and put it in between your thumb and middle finger, then use your pointer finger to tap it enough to cause a splatter. 

Easy as cake. Let the paint sink in for about 5-10 minutes so that you have the smooth look to it. Then use a top coat and you're done! 


MESSY! But worth it, see what I mean?


Here were the colors and polishes that I used. 


Thursday, April 26, 2012

Skillet Fried Chicken Tutorial

A while ago I posted the link for a delicious recipe for skillet fried chicken. I literally have made it twice this week already. I love this recipe so much. I changed a few things from the original recipe that I linked in the original post. This is a step by step tutorial on my take of this awesome meal that puts KFC to shame!


Friday, April 20, 2012

Acetone Manicure

So I am in love with this idea. And I mean IN LOVE WITH this idea. I will be doing more different variations with different colors. I got the tutorial from Nails Adored and she calls it the "Grunge Effect".

So this was my first try, and I think it came out great. I just forgot to put a top coat on and it ended up chipping the next day. I included a pretty in-depth tutorial. Keep in mind: this manicure is SO EASY! It probably takes 15 minutes from start to finish. It also helps because messing up is non-existent with this fun take on marbling.
1 & 2. I figured I don't too much with pink so I thought it would be fun to use a bunch of my pinks. The idea originally came about after seeing this picture of a breast cancer survivor. 
Her stomach says, "I had breast cancer and now I have Theo" in Portuguese.
Such a strong and amazing and brave and inspirational women. 

Tuesday, April 17, 2012

Decrease your chances of bubbles!

Simple fix:
Rub your nails with a cotton pad soaked with rubbing alcohol right before putting your base coat on.
It cleans and wipes away the oils and what not that have gathered on your nails throughout the process.


How to Make Your Braid Pop!

I stole this from the infamous Lauren Conrad.
Easy solution to make your braid flashy again!
So easy,
Just take your hair and divide it into the three strands that you want to braid together.
Take one of the strands and braid that one within itself (if that makes sense).
I use the bottom one so that I can try and braid the layers that are apt to falling out throughout the day.
Then I use a bobby pin and clip that to the bottom of the braid while I braid the 3 original strands together.
Then just tie with an elastic and there ya go!


Here is Lauren Conrad on Chelsea Lately with her hair done in this same simple way!


Need a Longer Flame?

As I do things around my place, I realize that some people don't know these tricks and that I should share them! So here goes!

When your favorite candles burn down past the point of getting a lighter or match successfully down to light them, what do you do?